Showing posts with label macarons. Show all posts

Sunday, April 22, 2012

Son of a Gun! It's Matcha!

Today we're saluting matcha green tea powder... the holy baking element that punches a hole in your wallet like a 24 karat fairy dust. Sometimes racking up to $15 per ounce, matcha is made through a crazy process in which only the finest, shade-grown leaves are picked, de-stemmed and deveined and stone ground, a process which can take up to an hour for only 30 grams of the stuff! Talk about labour. But, man-oh-man, it's freakin' beautiful:
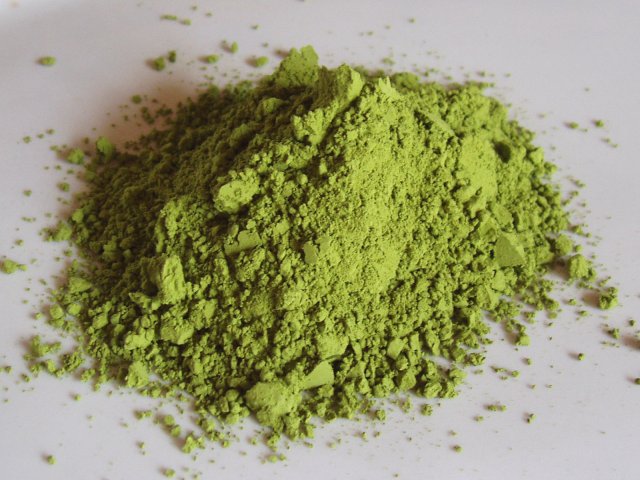
Matcha has other purposes besides being used in baked goods. Although it's super fine and pure, I don't think snorting it is  a golden idea.
I must say, in my past baking experience, I tried to get away with baking cakes by using the tea leaves (also called "matcha green tea") in the packets sold at stores. No can do. I even put a sackful in my Magic Bullet in vain hopes of reproducing the powder. It was like watching a five-year old try to drive an Escalade through a Gymboree... sheer hilarity. Not only were my cakes missing the bamboo-green hue of the powder, they were also lacking the quintessential flavour of matcha. Tragedy. First world tragedy, but nonetheless a tragedy. My success began when I finally grabbed the situation by the balls and put my baking before my penny-pinching tendencies (I found a small bottle of culinary matcha--pictured below--at the local Mitsuwa for $6). And boy, was it worth it...


Here's the recipe for ya! (adapted/size-adjusted from here because I made it for a small dinner party and didn't want a monster-sized cake, whose remains would have to sit in the refrigerator waiting for the Cretaceous period.)

Oven at 350*F
Ingredients
  • 1 1/2 c flour
  • 1 1/2 tbsp matcha powder 
  • 1/4 tsp baking powder
  • 1/4 tsp baking soda
  • 1/2 tsp salt
  • 1 stick of unsalted butter, softened (1/2 c)
  • 3/4 c granulated sugar
  • 2 large eggs, room temp
  • 1 tsp vanilla extract
  • 1/2 sour cream or plain yogurt

Sift together flour, baking powder, baking soda, salt and matcha powder. In a separate bowl, cream the butter and sugar. Add vanilla. Beat in the eggs, one at a time. Next: mix or fold in the dry mix. You're ready to bake! Put it in a 9" round or something of a similar size and in the oven she goes for about 30-40 minutes, depending on your oven. Give it the good ol' toothpick test before removing your beautiful cake. Let it cool before turning it out, slicing it, and dressing it with powdered sugar (use a sifter, or else you'll end up with  a hot, chalky mess).


So if you're a dedicated baker and now have this little can of matcha sitting in your cupboard, what else do you do with it? Well, if it's not baking matcha, treat yourself to a cup of tea! You deserve it. OR you can let you imagination fly with it! 

My friend Steven made matcha-frosted cupcakes filled with azuki (bean) for his birthday. Beautiful, no?
 One of my favourite treats with matcha are these suckers:


Yes, matcha macarons! Catherine of TheFoodCult gang helped me (literally) whip up this batch and they were brilliant! Another plus: these babies are gluten-free--almond flour is traditionally used to make macarons rather than all-purpose flour! To add matcha to your macs, just sift it in with the dry mix. Use enough to change the colour of the mix (the colour will also enhance during baking). If desired, you can mix matcha into your ganache, but I highly recommend "dissolving" it in the heated heavy cream first (dissolving it in water will make the fats in the ganache freak out--it's not worth the mess or the emotional distress) as opposed to adding it later.

Did you learn anything? Anything at all? Well, I hope this was a decent introduction to my slightly-expensive and bougie friend matcha powder. If you think of any crazy inventions with the elegant green fairy dust, send them along this way as I'd love to hear them!

Tuesday, September 20, 2011

Macaron Madness!


Macarons are pretty much the most pretentious cookies on the planet.


I've been obsessing over these little suckers over the past few weeks; I've done about a dozen batches before my mother called her friend to get tips for me! Finally I got a batch that *looked* right! They have the little feet and everything! I adjusted the proportions from several recipes to make smaller batches to just do test runs. Here's my recipe:

1 egg white
40 g almond flour (I just measured sliced almonds out and put it in a my Magic Bullet)
60 g powdered sugar
1.5 tbsp granulated sugar
Piping bag (ziplock bag if you don't have one)
Parchment paper
Oven at 275-300*F

You probably want to make the dry mix first. Do this by measuring out the almonds and blending it with the powdered sugar in a food processor. Next, sift it all out to get a fine powder.
Egg whites! When whipping egg whites, start adding the 1.5 tbsp of sugar when the whites start to foam. Continue the beatings till morale improves. When you pull the beater out of the egg white, the egg white should come up stiff (and not collapse back down). Disaster can also strike if you beat the white too much so be on the alert!

Next, fold the dry mix into your stiffened whites in 4-5 batches. If you're colouring your macarons, put the food colouring in now. Fold enough so it's mixed in and the dry mix is no longer visible, but not too much. If nudged, the dough should slowly sink back down.

Now, fill your piping bag with the macaron mix and pipe little circles onto the parchment paper-lined baking sheets. Leave space in between as they will spread out as they start to rest.

Let stand until film forms over macarons--a "skin" MUST form on the macarons. May take about 30 min. or possibly longer, depending on the humidity of the air; I find it best to make macarons when the weather is relatively dry. Test the macarons by gently touching the surface. If the dough does not stick, you're good to pop it in the oven. Let it bake for about 10-12 minutes.

When checking the macarons, they should have risen a bit to form "feet." They also should come off the parchment paper effortlessly if they're ready. If they're still stuck to the paper, they're not done yet! But watch them closely--if they stay in too long, they could crack, sag, or just get plain rock-hard.
Once again, this is a really pretentious cookie to bake, so don't be discouraged if you don't get 'em right in 10 tries. Seriously. Even professionals struggle with these.

To make a filling, you can use fruit preserve, whipped cream, peanut butter, Nutella or ganache, all which taste great! To make ganache, bring some heavy cream to a simmer and then pour it into a heat-safe bowl of chocolate or white chocolate chips. Stir until even and let it cool off until it's easier to work with. It should be like the consistency of Nutella when it's cool. If it's too liquidy, mix some flour or corn starch in to thicken it.

Fill your macarons with the filling of your choice and then they're free to eat. I have found them best at a day old, as the moisture in the filling seeps into the cookie at that point. Just store them in an air tight container and they're good for a couple days, but I doubt they will last that long! Happy baking! xx